- SUNY-Geneseo/Physics & Astronomy
- How to Get/Use the Excel
- Torque Practice Tool
- Dr. Pogo (pogo at geneseo.edu)
- Where's Pogo?
- Office: ISC 228D
Windows 10 & 11 have a lot of weird security phobias. One of them is that some kinds of files aren’t allowed to be downloaded anymore, by default. And even if you download them, they won’t run properly. Active Excel documents (i.e., workbooks that contain macros) are included on that list, so if you try to use this tool, your computer might not let you at first. Here’s how to overcome this particular problem.
How to get it and open it
- 1. Right-click this Excel icon.

- 2. Choose “save link as...”. Then, choose a place for it to go to on your own computer.
- 3. On your computer, go to that place, and find the new file “Torque.xlsm”. Note that you probably instructed your
- computer to lie to you about this and every other filename, so that your computer will incorrectly tell you that it’s
- just called “Torque”.
- 4. Right click it, and choose “Properties”.
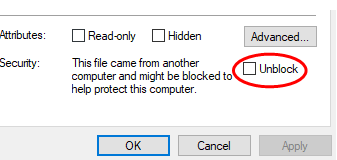
-

- 5. At the bottom, check the “unblock” box. Then click “Apply”, then “OK”.
- 6. Open this file in Excel.
How to use it:
- The plot shows one force. It is either an x or a y component, but not a diagonal.
- The plot shows the position of the axis of rotation.
- The darker grids are in meters, but the grayer sub-grids are half-meters.
- This tool uses the rule “counter-clockwise is positive”, as seen around cell G10.
- Use Excel (lower right corner) to change the viewing scale so that cells A1 through P30 are visible on your monitor. You can choose to see more than this, but these are the cells you are expected to be able to see.
- Use the gray button to randomly generate a new practice problem. Most of the problem is visual, but the magnitude of the force vector is displayed in cell G3, in red.
- Use the yellow button to see the answer. Did you get the sign right?
- See a hint: Use the green button to show the proper “R” vector that points from the axis to the force.
- See a hint: Since you only need the “perpendicular” component of “R”, as opposed to actually needing “R”, click the cyan/blue button to display the perpendicular component of R on the plot.
- Want to make a custom problem of your own? Use the six sliders (around cells E3 through E8) to change the force and/or the axis of rotation.