Glassware Safety
Glassware Safety
-
Introduction
-
Most of the equipment used in the labs is made of glass. Glass shatters, chips, and/or breaks very easily. Due to this, we have provided information on the safe handling of glassware, including the correct method of cutting glass tubing, handling broken glass, and disposing of broken glassware.
Handling Broken Glass
-
In general, don't!
Broken lab glassware, in addition to having sharp and jagged edges which can cause serious injury, you also have the added element of danger in that there is most likely chemical residue on the glass itself. Cutting yourself on a piece of broken glass with chemical residue on it could seriously mess things up, especially in an organic chemistry lab.
So if you have broken a piece of glassware holding any chemicals--a reaction, or simply a reagent waiting to be used--alert your instructor and/or TA. Your instructor will advise you in the proper method of cleaning up a chemical spill.
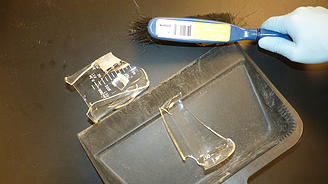
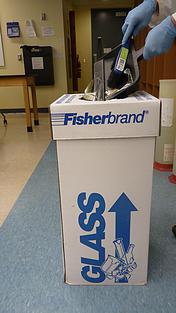
If you break a piece of glassware and chemicals are not involved, obtain a small dustpan and broom (there are a few sets in each teaching lab) and sweep up the pieces. Discard them in the white cardboard box marked "BROKEN GLASS" in the lab. Do not handle broken glass by hand, if it can be avoided. Please do not carry a piece of broken glassware down the hallway to show the Chemistry Stockroom. IT IS NOT SAFE! Take note what you broke, then after you've thrown the broken pieces away in the glass trash, go to the Stockroom and tell them what you broke so that they may help you replace it.
If you break a thermometer, alert your Instructor and then come to the Stockroom window to let someone there know. Please do not throw the broken thermometers away in the general or lab trash! Only place it in the Glass Trash, and do not carry it down the hallway to show the Stockroom. At SUNY Geneseo we generally only use dyed methanol thermometers, so they are only low toxicity. To safeguard against thermometer breakage, handle thermometers very carefully, do not use them as stirring rods, and always keep them well away from desk top edges so they cannot easily roll off.
-
Glass Tubing
-
Glass tubing is used frequently in the Chemistry labs, usually to build a vacuum trap used with vacuum filtration. The size typically used is 6mm diameter soft glass tubing.
If you need to use glass tubing in your experiment, the instructor will demonstrate its use, and the tubing will be supplied. If not, it may be available at the Chemistry Stockroom window if needed, and CS personnel will be happy to demonstrate the proper method of working with glass tubing.
Inserting Glass Tubing
Pieces of glass tubing (and sometimes thermometers) are frequently inserted through rubber stoppers. This procedure, while seemingly a simple one, is responsible for a majority of student injuries incurred in the Chem labs. To avoid injuring yourself, work safely and follow these instructions.
To insert a piece of glass tubing through a stopper:
- Wet the tubing and the stopper hole with glycerin.
- Grasp the tube near the point of insertion.
- Rotate the tube back and forth while gently pushing it into the stopper.
- Never attempt to push tubing directly through a stopper.
Once the tubing (or thermometer) is snugly inside the stopper, it's not a good idea to try to remove it after use. If you need to remove the stopper, come to the stockroom window, where we will use the most simple and direct method to remove the stopper: by cutting it off with a utility blade.
-
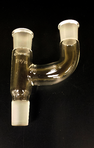
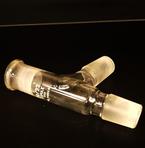
Ground-Glass Joint Glassware
-
For many years, manufacturers have been fabricating lab glassware with ground-glass fittings, or "joints", having standard dimensions and designed to fit each other perfectly. The joints are sometimes referred to as "standard taper" joints, because the joint is designated by a size (or taper), and any piece of standard taper glassware will fit any other piece of glassware with a similar standard taper.
The size used in the Organic labs is 19/22. Other common sizes include 14/20 and 24/40. The first number indicates the approximate diameter of the larger tube in millimeters; the second indicates the length of the ground surface. Generally speaking, the larger the numbers, the larger the joint size, and the larger the glassware.
There are several advantages to using ground-glassware, including avoidance of contamination of chemicals due to cork, rubber, or plastic connections, efficiency in setting up due to the quick assembly of apparatus, etc. About the only disadvantage of ground-glassware is the higher cost of the individual units: the items in your equipment drawer with ground joints are among the highest-priced items you will be using in your lab course.
Care of Ground-Glass Surfaces
Ground-Glass Joint glassware is precision-ground to a specific taper, and this allows the snug fit when two corresponding pieces are joined. But proper care must be taken of the ground surface to ensure that the equipment will function properly when used.
A. Lubrication:
Although ground-glass joints usually seal quite well without the use of lubricants, it is generally a good idea to lubricate them to prevent "freezing" and therefore breakage. Under most conditions in the Organic teaching labs, a lubricant should be used. This makes it easier to separate ground-joint ware and prevents leakage. Ground-glass joints must be kept clean and must be cleaned prior to lubrication. Dust, dirt, chemical residue, and/or particulate matter may score the surface and cause leakage.
Stopcock grease is the joint lubricant used in the Chem labs. It is kept in a small jar near the instructor's station in the teaching lab, with the rest of the stock reagents and supplies. Note that the grease is hydrocarbon (petrolatum) based, and therefore is soluble in most organic solvents. This means that you will need to re-apply fresh grease every time you carry out a reaction, since it may dissolve somewhat during use.
1. Lubricating Ground-Glass Joints:
- Use a boiling stick to apply a small amount of grease to the upper part of the inner joint, taking care not to grease any part of the joint which may come in contact with vapor or liquid and cause contamination. A properly lubricated joint appears completely transparent, with no striations.
2. Lubricating Stopcocks:
The following applies only to glass stopcocks; Teflon stopcocks require no lubrication.
- Use a boiling stick to apply two circular bands of grease around the stopcock, midway between the bore and the ends. Insert the stopcock into the barrel (of the separatory funnel) and twist several times. The grease will spread out and the joint will be completely transparent.
- Avoid using too much grease; it could plug the bore of the stopcock. If this happens, come to the Chemistry Stockroom window and request a pipe cleaner to unplug the bore or ask for further assistance.
B. Storage of Glassware:
At the end of your lab period, you should take apart and clean all ground-glass joints. The grease is hydrocarbon-based, so it is soluble in most of the organic solvents stocked in the teaching lab rooms. Leaving a joint sticky with grease provides a surface to which dirt and particulate matter can adhere, possibly scoring the surface when the apparatus is used again. Leaving a joint assembled can result in the joint "freezing" together. Similarly, take apart (glass) stopcocks and store the piece unassembled.
Assembling of Ground-Glass Joint Glassware
Proper assembly of apparatus is necessary to assure a successful experiment. It also helps to prevent glassware breakage, and therefore might save you from having to pay for a few costly items. Follow these guidelines:
- Plan your assembly so the working area will be uncluttered, with easy access to all components.
- Use as few clamps as possible to support the apparatus firmly. The precision of the ground-glass joints allows little room for misalignment, and the joints themselves provide mechanical support and rigidity
- Support all flasks with support rings for stability, even though clamps may support the neck of the flask
- Always assemble the apparatus from the bottom up:
- Fasten all clamps loosely at first, except the bottom clamp.
- Gradually tighten all clamps as the apparatus goes into complete assembly.
- Be sure alignment is correct, then finally tighten all clamps.
- Do not position your apparatus at an angle.
- Never force alignment of ground-glass apparatus. This causes breakage, leakage, and improper function of the apparatus.
Frozen Joints
Laboratory distillation glassware, separatory funnels, and reagent bottles with glass-to-glass connections sometimes become "frozen," or stuck. To loosen stopcocks, stoppers, or ground-glass joints, you may use the following techniques at your own risk.
Caution: Remember glass is fragile, and broken glass can cause cuts and serious injury. Use care and handle gently! Do not apply too much force or subject to rough treatment. If you would rather not attempt any of the following procedures, simply bring your frozen joint to the Chemistry Stockroom window and request that CS personnel assist you.
To loosen a frozen joint:
- Gentle tapping: Gently tap the frozen stopcock or stopper with the wooden handle of a spatula (or with the wooden test tube rack in your drawer). Do not tap with another piece of glassware. Tap so the direction of force will cause the stopper to come out. If you tap too hard, you can break the stopper. Always work directly over a benchtop covered with soft cushioning material to prevent the falling stopper from breaking.
- Heating: Heat causes the housing to expand. Try immersing the frozen connection in hot water. When it is hot, gently tap with the wooden handle of a spatula. Repeat several times, allowing the housing to expand and contract to break the frozen seal.
- Soaking: Soak the frozen assembly in hot dilute glycerine and water. The penetration of the liquid is evident by the appearance of liquid between the joints. Allow to soak long enough to allow fullest penetration, then remove and rinse thoroughly with tap water and try gently twisting the joint, or tapping as described above.
- The "I Give Up" Approach: Often the most popular method of dealing with a frozen connection is to simply ask Stockroom Dan to take care of it for you. Keep in mind, though, that we have been dealing with this stuff for years, so if we hand back your piece of equipment after loosening it with about 2 seconds of effort, don't feel bad, as if your problem was trivial or a waste of time: we've just had more practice! Of course, sometimes we will simply exchange your frozen piece of equipment for another (non-frozen) one.
-
Washing and Cleaning Lab Glassware
-
Most pieces of lab glassware can be cleaned by washing and brushing with a detergent or with a special laboratory cleaning product called Alconox (the "SOAP" jugs in the lab rooms next to the sinks contain a dilute Alconox and/or dish soap solution). After they have been thoroughly cleaned, they should be rinsed with tap water and allowed to dry.
Always clean your glassware and apparatus immediately after use, if possible. It is much easier to clean the glassware before the residues in them become dry and hard (plus you are more likely to remember what the item was used for to decide what will clean it best). If dirty glassware cannot be washed immediately, put it in water to soak. Handle glassware carefully when cleaning it, as the soap and water will make it slippery. Be sure to rinse off all soap or detergent residue after washing glassware to prevent any possible contamination later.
To dry your clean glassware, you can rinse it with small portions of acetone (there are a couple of wash bottles in the lab rooms containing wash-grade acetone). This should be used sparingly. Another method of drying glassware is to use the dryer oven located in the organic lab. You can determine whether glass is clean by spraying distilled water on it: water spreads out evenly and smoothly on clean glass, but stands in droplets on soiled glass.
Sometimes the residue on your glassware won't come clean with just soap and water and scrubbing, although most of the time it will. There are a few other methods to clean your glassware, but it really depends on the nature of the residue. The following tips should cover most of the eventualities you will encounter in the Chem teaching labs:
Organic residue
- Like dissolves like, so try some wash-grade acetone. If this doesn't work, try a low-molecular weight solvent like methanol or ethanol. If everything else fails, try a little ether.
Inorganic residue
- Again, like dissolves like, so soap and water should do the trick in most cases. If you are using a metal salt, try a dilution of the corresponding mineral acid (for instance, sulfate salts are soluble in dilute sulfuric acid, etc.).
Oily or greasy residue
- This is probably organic in nature, or might simply be smeared stopcock grease. Stopcock grease and most oily residues are usually soluble in petroleum ether (either high-boiling or low-boiling) or hexane.
Brown permanganate stains
- Although inorganic in nature, these stains are difficult to remove with just soap and water. A dilute aqueous solution of oxalic acid (available from the OCS window on request), however, is guaranteed to remove the residue.
Remember the adage: "Like dissolves like." No matter how much you try, acetone will not clean ionic salt solutions. Do take care to not waste acetone in the organic or advanced chem labs trying to clean something that is not appropriate to be cleaned with acetone solvent.
It is not Chemistry Stockroom policy to clean glassware for students, though CS personnel will be happy to give tips on cleaning methods. If you really, really can't get a stain or residue off your glassware, we may allow you to exchange it for a clean piece. If we can tell you expended a fair amount of effort, we will be more accommodating.