|
ACTIONS: AUTOMATING TASKS IN PHOTOSHOP
While Photoshop has a host of automation tools, the most
versatile, and indeed the most powerful, is called an Action. If you
know how to use Photoshop, you know most of what you need to create
your own action.
Let's say you have 100 Photo CD images that you want to
put on the Web: you could load each one, scale it down, color correct
it, sharpen it, and then save it as a JPEG. Or, you could write an action
to do the dirty work for you while you kick back and relax. And, best
of all, you will achieve consistent results in far less time than you
could ever have done manually! Actions can shave seconds, minutes, or
even hours off production time.
Although you could write an action to do just about anything,
some common uses include: repeating tedious or boring tasks; distributing
reproducible special effects (usually for type); and batch processing
multiple images.
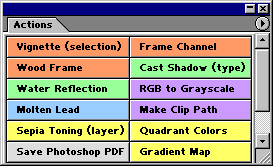
INTRODUCTION TO THE ACTIONS PALETTE
The Actions palette is like a small (yet powerful) action editor: it
allows you to (among other things) create, edit, load, save, delete
and play actions. To show or hide the Actions palette, use the Window
» Show Actions command or press F9 on your keyboard. The figure below
shows the Actions palette in List View Mode (its default mode).

A. Stop Playing / Recording
Stops an action that it is playing. Also turns off record mode. This
button is equivalent to pressing Esc or Ctrl-Period. You may also stop
recording by choosing Stop Recording from the Actions palette menu ().
B. Begin Recording
Push the record button to begin recording a new action or to add additional
commands to an existing action. If an action itself is selected, new
commands are appended to the end of the action. If an action step is
selected, new commands are inserted after the current action step. You
may also begin recording by choosing Start Recording from the Actions
palette menu.
Note: You may re-record the parameters for a command
by double-clicking on its associated action step. If available, the
command dialog will appear allowing you to enter new values. Choose
OK to apply the new settings or Cancel to leave the original settings.
C. Play Selection
If an action is selected, pushing this button plays the entire action.
If an action step is chosen, the action will begin playing from the
currently selected command (to the end of the action). You may also
choose Play from the Actions palette menu.
Note: To play only the current action step, Ctrl-click on the
Play button or Ctrl-double-click the desired action step.
D. Create New Set
Click this button to create a new action set. A dialog box will prompt
you for the set's name. This button is equivalent to choosing the New
Set command from the Actions palette menu.

E. Create New Action
Click this button to add a new action to the selected set. A dialog
will prompt you for the action's name, associated set, keyboard shortcut
and Button Mode color. This button is equivalent to choosing the New
Action command from the Actions palette menu.
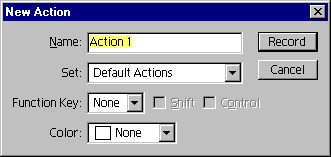
Note: Alt-click the New Action button to skip the
dialog and simply accept the default name (and settings) for the new
action. Drag-and-drop an existing action onto the New Action button
to duplicate it. This is equivalent to choosing Duplicate from the Actions
palette menu
F. Delete
Deletes the selected set, action or command. A dialog box will appear,
allowing you to confirm the operation. Alternatively, you may access
the Delete command from the Actions palette menu.
Note: Alt-click the Delete button to delete the selected item
without confirmation. This is equivalent to dragging the desired item
onto the Delete button. Delete operations performed in the Actions palette
are not added to the History, nor are they available via the Edit »
Undo command. However, you may undo / redo (only) the last delete operation
by pressing Ctrl+Z.
G. Action Set
Sets behave similarly to folders in that they allow you to organize
your actions. You may have as many as 24 actions within each set; and
you may have as many sets as you like. Double-click on a set (or choose
Set Options from the Actions palette menu) to change its name.
H. Action
An action is basically a Photoshop macro containing one or more pre-recorded
commands and/or operations that can be replayed on an image (or sequence)
by clicking the Play button or by pressing a predefined keyboard shortcut.
Playing an action executes the series of commands contained within it.
Actions can only be created within a set (i.e. they cannot exist in
the Actions palette outside of a set). Double-click on an action (or
choose Action Options from the Actions palette menu) to change its name,
keyboard shortcut and Button Mode color.
I. Action Step / Command
Quite simply, action steps are pre-recorded Photoshop commands. Actions
are comprised of one or more action steps.
Note: Alt-drag-and-drop an existing action step to duplicate
it. This is equivalent to choosing Duplicate from the Actions palette
menu.
J. Actions Step / Command Details
Expanding an action step (by clicking on its associated triangular icon)
reveals the details (or values) that were set for the command at the
time it was recorded.
Note: You may change the parameters for a command by double-clicking
on its associated action step (or by choosing Record Again from the
Actions palette menu). If available, the command dialog will appear,
allowing you to enter new values. Choose OK to apply the new settings
or Cancel to leave the original settings.
K. Dialog Checkbox
This checkbox is used to enable (or disable) a command's dialog box
– the checkbox is only available for commands that have an associated
dialog box. If enabled, a small dialog icon will appear to indicate
that Photoshop should pause the action at the designated step to prompt
the user for the desired values. The default is to not display a dialog
box (indicated by an empty checkbox), but instead, to use the values
that were recorded for the command when the action was created.
Note: Enabling (or disabling) the dialog checkbox for a set
turns on (or off) all dialogs for all actions within the set. Similarly,
enabling (or disabling) the dialog checkbox for an action turns on (or
off) all dialogs for all applicable commands within the specified action
(but does not affect any other actions within the current set). A red
dialog icon indicates that one or more (but not all) dialogs have been
enabled within an action (or set). A grey (or ghosted) dialog icon indicates
one of two things: either the dialog box has been enabled, but the command,
action or set has been excluded; or, the command was inserted, without
values, via the Insert Menu Item command (see below). In the case of
the latter, the user will be prompted for values when the action is
executed.
L. Include Checkbox
The include checkbox is used to turn action steps – or even entire
actions or sets – on or off. By default, all commands have a small
checkmark icon, indicating that the commands are to be included when
an action is played. An empty checkbox indicates that the command has
been disabled (or excluded), meaning that Photoshop will skip over it
when executing the action.
Note: Enabling (or disabling) the include checkbox for a set
turns on (or off) all steps for all actions within the set. Similarly,
enabling (or disabling) the include checkbox for an action turns on
(or off) all steps within the specified action (but does not affect
any other actions within the current set). A red checkmark icon indicates
that one or more (but not all) steps within an action (or set) have
been disabled.
M. Actions Palette Menu
In addition to the many controls discussed above, the Actions palette
menu (accessed by clicking the  button) also contains several commands that are very useful for creating
and editing actions.
button) also contains several commands that are very useful for creating
and editing actions.
Dock to Palette Well
Quite simply, this command stores (or "docks") the Actions
palette in the Palette Well (on the right side of the Options palette).
This is equivalent to manually dragging the Actions palette into the
Palette Well.
Button Mode
By default the Actions palette appears in List View Mode. Button Mode
turns each action into a button displaying the name, color and keyboard
shortcut assigned to it in the Action Options dialog. Simply click a
button to play its corresponding action. Despite how easy Button Mode
is to use, its usefulness is limited because you cannot create, edit
or modify actions in any way while in this mode.
Insert Menu Item
This command allows you to insert the selected menu item into the current
action. Inserted items appear below the active action step. This command
is available regardless of whether or not you are in record mode.
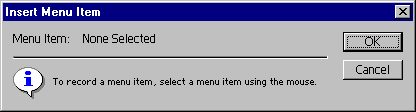
Two key uses for this command are: to insert commands that may otherwise
be unavailable (or inaccessible) while in record mode (such as showing
or hiding palettes); or, to insert a command without values (so as to
prompt the user for input when the action is played).
Insert Stop
Despite its name, a stop does not actually stop an action; it simply
pauses the action to display a user-defined message box (of up to 200
characters). Typical uses for a stop include: providing instructions
or copyright and/or version information to other users; or, to allow
the user to perform manual tasks such as painting, or inserting text,
prior to resuming the action. By default, Stop dialogs always contain
a Stop button: however, an optional Continue button may also be included.
Insert Path
This command is only available when a path (or shape) is selected. Use
it to insert the selected path into the selected action (below the active
step) as a series of anchor and handle coordinates.
Tip: Set your ruler units to percentage before using this command.
This will ensure that the path is sized and positioned relative to the
canvas size. Otherwise, the path may appear too large, or completely
outside the canvas boundaries.
Set / Action Options
Use this command to rename an action (or set) or to change its function
key or Button Mode color. You may also double-click on an action (or
set) to access the Options dialog box.
Note: Assigning a keyboard shortcut (or hotkey) allows you to
quickly execute an action by pressing the assigned key(s) on the keyboard.
You may even wish to assign a keyboard shortcut to frequently used commands
that do not already have an associated "hotkey" (such as Image
» Crop, or Edit » Stroke).
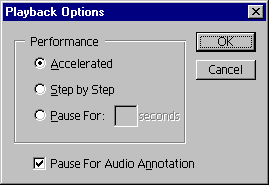
Playback Options
This command allows you to set the playback speed for actions. Accelerated
plays actions as fast as possible (which is desirable for most circumstances),
Step by Step allows the screen to refresh between commands (useful for
debugging), and Pause For pauses between commands for the defined number
of seconds (between 1 and 60). You may also toggle the Wait For Audio
Annotation option on or off.
Clear All Actions
As the name implies, this command removes all actions (and sets) from
the Actions palette.
Note: Although you cannot undo this operation via the History
palette or the Edit » Undo command, you can undo (or redo) the
last operation (only) by pressing Ctrl+Z.
Reset Actions
This command removes all actions from the palette and replaces them
with the default set.
Note: Selecting this command will result in a warning message
that allows you to accept the replacement, cancel it, or append the
default set to the existing set(s). Hold down the Alt key when choosing
this command to skip the warning. This command can be undone by pressing
Ctrl+Z.
Load Actions
Use this command to load an existing action set. Also note that you
can quickly load actions by choosing them (by name) from the bottom
of the palette menu.
Note: In order for an action to appear in the Actions palette
menu, it must be saved in the Photoshop 7.0\Presets\Photoshop Actions\
folder (or subfolder).
Replace Actions
Replaces all actions (and sets) in the Actions palette with the selected
set.
Save Actions
Although the contents of the Actions palette are remembered from one
session to another, they are not really saved until you save them using
this command. In fact, you cannot use either of the above commands (Load
Actions and Replace Actions) for a set until it has first been saved.
Also, you cannot save individual actions, only sets. If you want to
save a single action, it must be placed into its own set. Save your
actions in the Photoshop 7.0\Presets\Photoshop Actions\ folder (or subfolder).
Creating simple actions===>
|
